Every professional auto painter knows the secret to flawless paint jobs lies in the preparation. And when it comes to creating those razor-sharp lines and perfect curves, nothing beats fine-line masking tape. This isn't your ordinary masking tape—it's a precision tool designed specifically for automotive applications where clean edges make all the difference.
What Makes Fine Line Tape Different?
Unlike standard masking tape, fine line automotive masking tape features a thin, flexible edge that conforms perfectly to vehicle contours. The tape itself is typically made from a soft, pliable material that bends without creasing or lifting. This makes it ideal for complex curves and detailed work where thicker tapes would fail.
The most common type is the fine line tape for painting that comes with a firm backing but soft edges. This unique construction allows the tape to create a seal that prevents paint bleed while remaining easy to remove without damaging fresh paint.
Essential Tools You'll Need
Before starting your project, gather these materials:
• Fine line masking tape (1/4-inch or 3/8-inch width)
• Regular masking tape for larger areas
• Pre-paint cleaner or wax remover
• Lint-free cloths
• Squeegee or plastic spreader
• Your chosen automotive paint system
Step-by-Step Application Process
Step 1: Surface Preparation is Everything
Begin with a perfectly clean surface. Any dirt, wax, or oil under the tape will compromise adhesion and lead to paint bleed. Use a quality pre-paint cleaner and lint-free cloth to thoroughly clean the area where you'll apply the tape. Allow the surface to dry completely.
Step 2: Plan Your Tape Lines
Visualize where you want your paint lines to appear. For complex designs, you might even use a washable marker to sketch guidelines. Remember: flexible masking tape for curves works best when you apply it in smooth, continuous motions rather than short, segmented pieces.
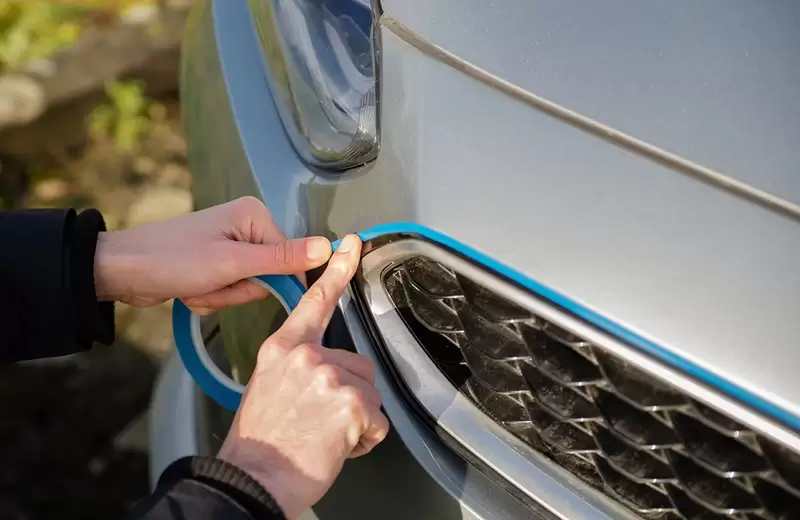
Step 3: Applying the Fine Line Tape
Start by peeling back 2-3 inches of tape from the roll. Position the edge exactly where you want your paint line to appear. As you apply the tape, use your thumb to press it firmly into place, working in sections of about 12 inches at a time.
For curved surfaces, flexible masking tape should be applied with a technique called "rolling the edge." Gently stretch the tape as you follow the contour, allowing the flexible edge to conform naturally to the curve. Avoid forcing the tape into position—let the material do the work.
Step 4: Sealing the Edge
This is the most critical step for preventing paint bleed. After applying the fine line tape for painting, use a plastic squeegee or your thumb nail to burnish the edge firmly against the surface. Apply extra pressure along the edge that will define your paint line. This creates a microscopic seal that paint cannot penetrate.
Step 5: Backing with Standard Tape
Once your fine line tape is in place, use regular masking tape to cover the remaining areas that need protection. Overlap the standard tape onto the fine line tape, creating a continuous barrier. This saves your more expensive fine line automotive masking tape for only where it's needed most—the critical edge.
Pro Tips for Perfect Results
Temperature Matters
Apply tape when the vehicle surface is between 60-80°F (15-27°C). Cold surfaces cause tape to stiffen and not conform properly, while hot surfaces can make the adhesive too aggressive.
The 45-Minute Rule
Don't leave fine line masking tape on the vehicle for more than 24 hours before painting. The adhesive can become more difficult to remove and might leave residue.
Painting Technique
When spraying near the taped edge, always spray toward the tape rather than parallel to it. This reduces the chance of paint creeping underneath. Maintain a consistent distance of 6-8 inches from the surface with your spray gun.
Removal Timing
Remove the tape while the paint is still slightly tacky—typically within 10-20 minutes of applying the final coat. Pull the tape back on itself at a 45-degree angle rather than straight up. This creates the cleanest possible edge.
Common Mistakes to Avoid
Using the Wrong Tape for the Job
Not all flexible masking tape is created equal. Avoid using vinyl or electrical tape as substitutes—they can leave adhesive residue or damage paint.
Rushing the Application
Taking extra time during tape application pays dividends in the final result. Rushed tape jobs always show in the finished paint work.
Inadequate Surface Preparation
Even the best fine line masking tape won't adhere properly to dirty or contaminated surfaces. The cleaning step is non-negotiable.
Why Professionals Swear By Fine Line Tape
Auto body professionals choose fine line automotive masking tape because it:
1.Creates sharper lines than any other masking method
2.Conforms to complex curves without kinking
3.Removes cleanly without pulling up fresh paint
4.Saves time compared to hand-taping difficult shapes
5.Reduces touch-up work by preventing paint bleed
Conclusion: Elevate Your Paint Work with the Right Tape
Whether you're a professional painter or a dedicated car enthusiast, mastering fine line tape for painting will transform your results. This specialized tool takes practice to use effectively, but the learning curve is well worth the effort. The crisp, professional-looking lines you'll achieve will make your paint work stand out from the crowd.
Remember that like any skilled technique, perfecting your tape application requires patience and practice. Start with small projects to build your confidence before tackling complex multi-color designs. With time, you'll find that this humble tape becomes one of your most valued tools in the paint shop.
Always test tape on an inconspicuous area first. Remove tape carefully and consult with paint manufacturers for specific recommendations compatible with your paint system.